How to Fix 403 Forbidden Error?
The “403 Forbidden” error means the server received your request but refuses to give you access to the page. This guide helps you find what causes the error in your case and fix it, whether you are a visitor or the website owner.
What you need for the website owner fixes
- Access to your hosting panel. On SiteGround, that is Site Tools, which you open from Websites in your Client Area.
- A way to edit files: File Manager in Site Tools, or an FTP or SSH client.
- Access to your WordPress dashboard, if your website runs on WordPress.
What is the 403 Forbidden Error?
403 Forbidden error means the server understands your request, but won’t allow access. This can happen due to several reasons, including incorrect file permissions, authentication issues, firewall restrictions, insufficient user rights, or hosting limitations.
Therefore, you cannot access the website’s resources, and your browser informs you of the problem.
The error code 403 is one of the many 4XX HTTP status codes. The common trait shared between all 4XX codes is that they are client error responses: the server returns them when it considers the problem to be on the side of the request, such as a missing permission or a wrong URL.
Website owners and servers could customize the “HTTP 403 Error” page. Therefore, you may see different design variations and messages on the error page. The message may state:
- HTTP 403 Error
- 403 – Forbidden access is denied
- 403 Forbidden error
- HTTP 403 Forbidden
- Forbidden
- 403. That’s an error
- 403 – Forbidden
On websites hosted with SiteGround, the error page looks like this:

Troubleshooting the error depends on the nature of the problem causing it. The following section will examine the usual causes.
How to Fix the “403 Forbidden” Error?
The problems causing the “403 Forbidden” error are quite diverse and require different approaches to be fixed. Some of the solutions can be implemented by both visitors and website owners, assuming that the problem originates from their local device or network. However, issues caused by a website configuration can be examined only by the website administrators as they require access to the backend settings.
We will start with the general solutions that anyone can try and narrow down to the more specific ones that mandate administrator privileges to the website.
Reload the Page
Start by reloading the page. Sometimes, the error may briefly appear on a site due to a misconfiguration. The issue is then fixed and the website is now accessible, but you loaded the webpage at the wrong moment.
It’s always worth testing by reloading the page again, since it’s the fastest and simplest check that can save you a lot of time from troubleshooting further.
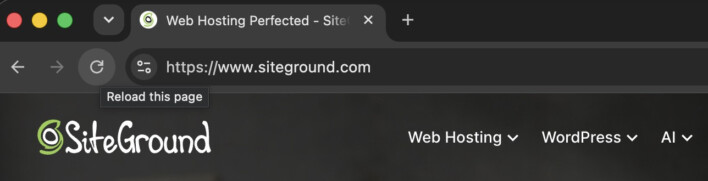
All browsers have a Reload button located next to the address bar. You can also use the keyboard shortcut Command+R on MacOS or F5 (Control+F5) on Windows. Below, you can see the Reload button on the popular browser Google Chrome.
Clear Cache and Cookies in Your Browser
Clear your browser’s cache and cookies, then reload the page. You may see the “403 Error” message on a webpage if you previously visited it and your browser generated cached files and cookies. The webpage may have been altered, and the cached browsing data has expired and is outdated.
Thus, the browser doesn’t load the required assets to visualize the webpage, producing the “403 Restricted Access” page. For detailed instructions on clearing the browsing data on your specific browser or device, read the guides below:
- How to clear the cache and cookies on desktop browsers
- How to clear the cache on Android devices
- How to clear the cache and cookies on iPhone
Open the website from another network
If only you see the error, check whether your network or country is blocked. Some website owners intentionally block a specific range of IP addresses and, in some cases, access from an entire country. Therefore, your ISP network or country may be blocked by the website.
Test opening the site from another network or VPN from another country. If the website opens, it is an indication that either the network or your country is blocked.
You can contact your ISP and ask them if your IP has been changed or reach out to the website’s administrators and inform them of the restricted access.
Check the URL of the web page you try to access
Make sure the URL is correct and, if you own the website, that no folder has the same name as the page. A common cause of the 403 error code is a mistyped URL. Double-check the URL you typed in the browser. Most web servers are configured to disallow direct access to directories by default.
Usually, webpages of static websites have an address ending with a file extension like .php or .html. If the extension is missing, you may be accessing a folder, and since the server protects it from browsing, you receive the “Permission denied” error.
Pages on WordPress and other CMS applications (Joomla, Magento, e.g.) are entries in the website database. They are not individual files, thus their URL addresses don’t end with a file extension. A typical problem with such websites is an existing empty folder sharing an identical name with a website page.
If you are only a visitor, make sure you have the correct URL, as you may have mistyped it.
If you are the website owner, inspect the folders of your website. If your website is hosted with SiteGround:
- In your Client Area, go to Websites and click Site Tools next to your website.
- Go to Site > File Manager.
- Open your website’s root folder (your site name/public_html) and check its folders.
For example, we created a webpage siteground.example.com/test-page/ on our WordPress site.
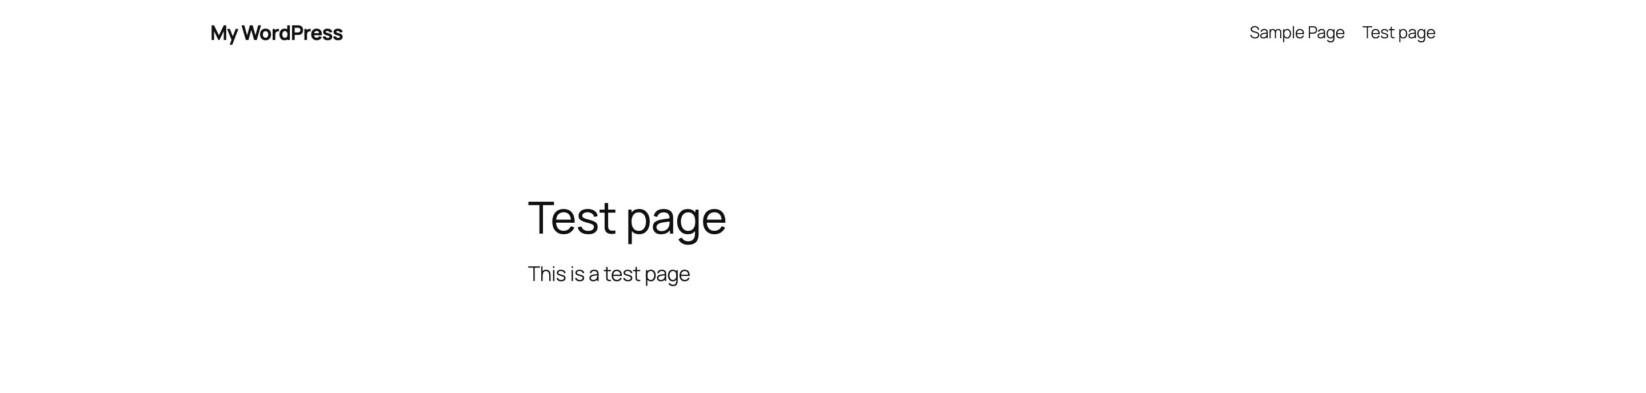
Later, we created a sub-folder test-page/ in the root folder of the website siteground.example.com/public_html.
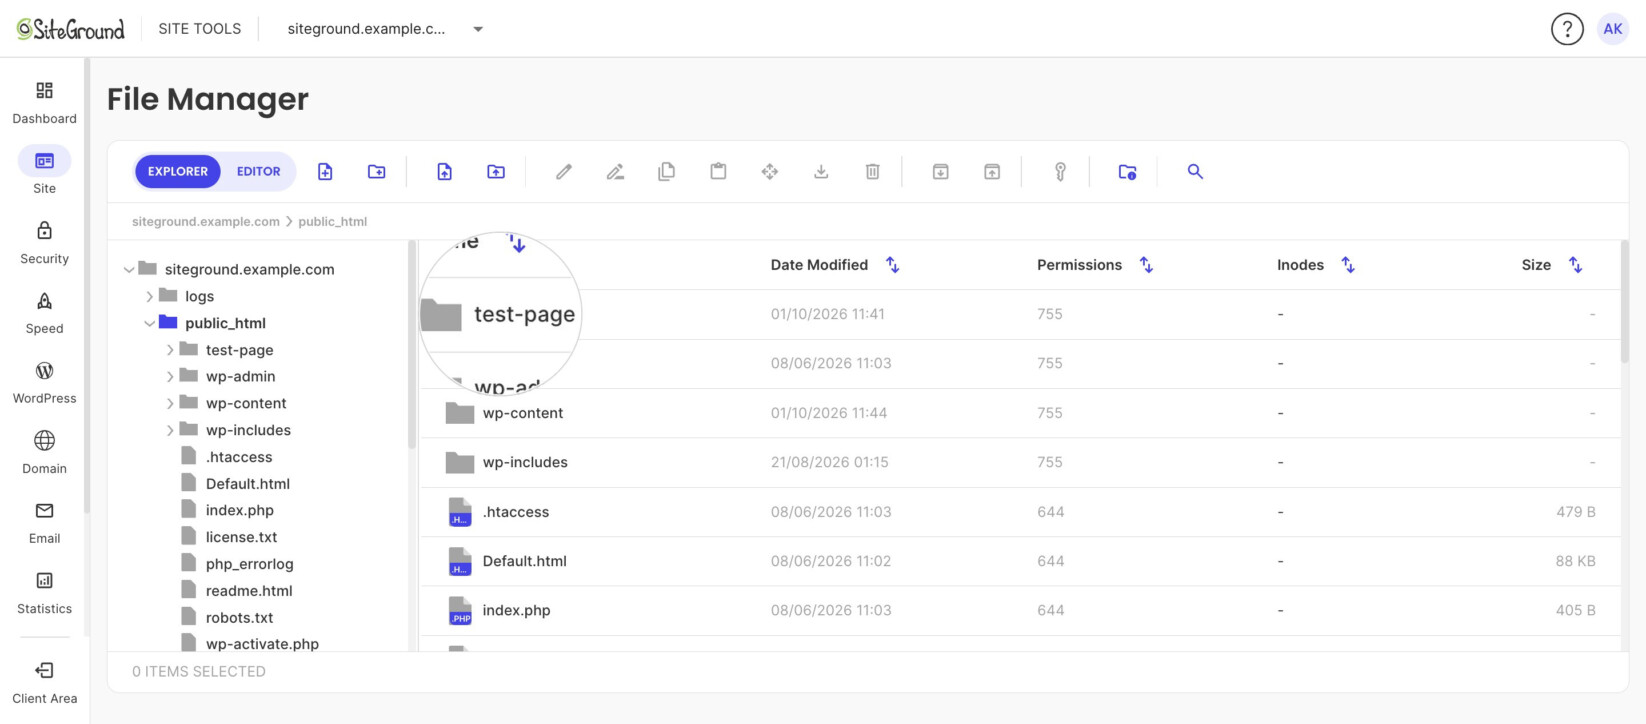
The folder test-page/ has the same address as the page – siteground.example.com/test-page/. The server always loads the folder with priority. Since the folder is empty, the address comes up with the “403 Forbidden” error.
Your website may also contain a folder sharing the name with an existing webpage or post on your website. You can test renaming the folder or deleting it. Then, reload the page and the error should not appear anymore.
Check if the domain of the website is pointed to the correct server
Make sure your domain points to the server that hosts your website. A website can return the “Permission denied” error if its domain is not pointed to the correct server. This issue can usually appear after a website migration from one hosting server to another.
The standard scenario is when you’ve already transferred the website data to the new hosting server, but its domain is still pointing to the old server through DNS records. The previous hosting has already limited access to your expired account, and since the domain still opens from their platform, visitors receive the “Permission denied” error.
Your first step should be to check where your domain currently points to. You can use any online DNS lookup tool, such as DNS Watch. Type your domain in the DNS lookup tool to see its A record and nameservers.
Open your current hosting panel, which should display information about the server/website IP address and nameservers. SiteGround users can see the detailed steps in this tutorial on how to find their website IP.
Once you have the details, point your domain’s nameservers or A record to the correct servers.
Look into your server’s error logs
Check your website’s error log for entries that show denied access. Often, the error is caused by a server configuration for the website. As a website owner, you can check the error logs from your hosting panel, as they might show the source of the problem.
If your website is hosted by SiteGround:
- In your Client Area, go to Websites and click Site Tools next to your website.
- Go to Statistics > Error Log.
- Under Select Domain, choose your domain.
- Examine the records and look for any errors that indicate denied access. The log shows the 300 most recent errors.
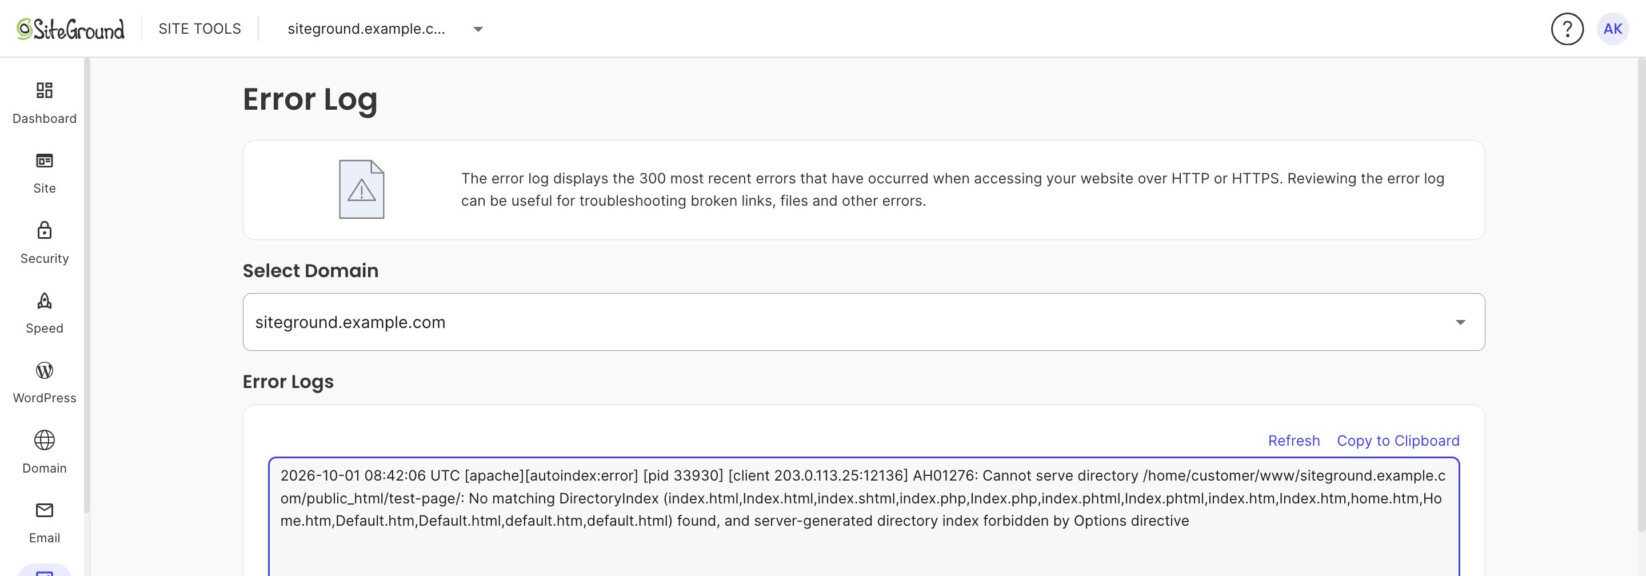
In this example, the error log reads the following text.
2026-10-01 08:42:06 UTC [apache][autoindex:error] [pid 33930] [client 203.0.113.25:12136] AH01276: Cannot serve directory /home/customer/www/siteground.example.com/public_html/test-page/: No matching DirectoryIndex (index.html,Index.html,index.shtml,index.php,Index.php,index.phtml,Index.phtml,index.htm,Index.htm,home.htm,Home.htm,Default.htm,Default.html,default.htm,default.html) found, and server-generated directory index forbidden by Options directive
Log entry from the recaptured screenshot; the client IP is a documentation address.
The record points out that the website is missing an index file, hence the server denies access.
Another example of a log entry you may see related to this error is:
wordpress error: 2024-07-09 08:43:12 UTC [apache][access_compat:error] [pid 64287] [client 104.183.35.139 AH01797: client denied by server configuration:
The above indicates that there is a problem with the .htaccess rules for your app or a problem with the permissions for the files on your website.
Your website might show a similar log that could help you narrow down the problem.
Fix the File and Folder Permissions of the Website
Make sure your files and folders have the permissions your hosting requires. Incorrect file and folder permissions for your website can also cause the HTTP 403 Error. Many servers have default permissions, and if your website doesn’t match them, access for visitors is denied.
You may have transferred the website from another hosting where their servers required different permissions from the ones used on your current hosting. Or perhaps a plugin or script altered your website’s permissions. Either way, having the wrong permissions would trigger the 403 error. Ensure that your website files and folders have the permissions required by your hosting.
SiteGround-hosted websites should have the permissions set to 644 for files and 755 – for folders. For a WordPress site, you can easily reset the permissions from WordPress > Install & Manage in Site Tools.
Your hosting may not have a similar tool for permissions management, or your website might be built on another application. Read the following guides about other ways to reset the permissions.
- How to reset the permissions of your website from File Manager in Site Tools?
- How to reset the permissions from an FTP client?
- How to reset the permissions from SSH?
Check if the Website has an Index File
Make sure your website’s root folder contains an index file, such as index.php or index.html. Many server configurations deny access to the website when the index file is missing. Perhaps you migrated the website to a new hosting, but the index file did not carry over; you deleted it by mistake or renamed it. In either case, visitors accessing the website may see the error page.
Examine your website root folder and check if the index file is present.
If you are a SiteGround user:
- In your Client Area, go to Websites and click Site Tools next to your website.
- Go to Site > File Manager.
- Open your website root folder, which is the site name/public_html, and check if the index file is there.
In our example, the website is siteground.example.com, so the root folder is siteground.example.com/public_html. There is no index file, and the access is blocked from the server-side.
To correct the issue, inspect the backup archive you have from your previous hosting and look for the index file – index.php or index.html. Then, upload it to public_html:
- In File Manager, open the public_html folder.
- Click File Upload in the toolbar.
- Select the index file from your backup.
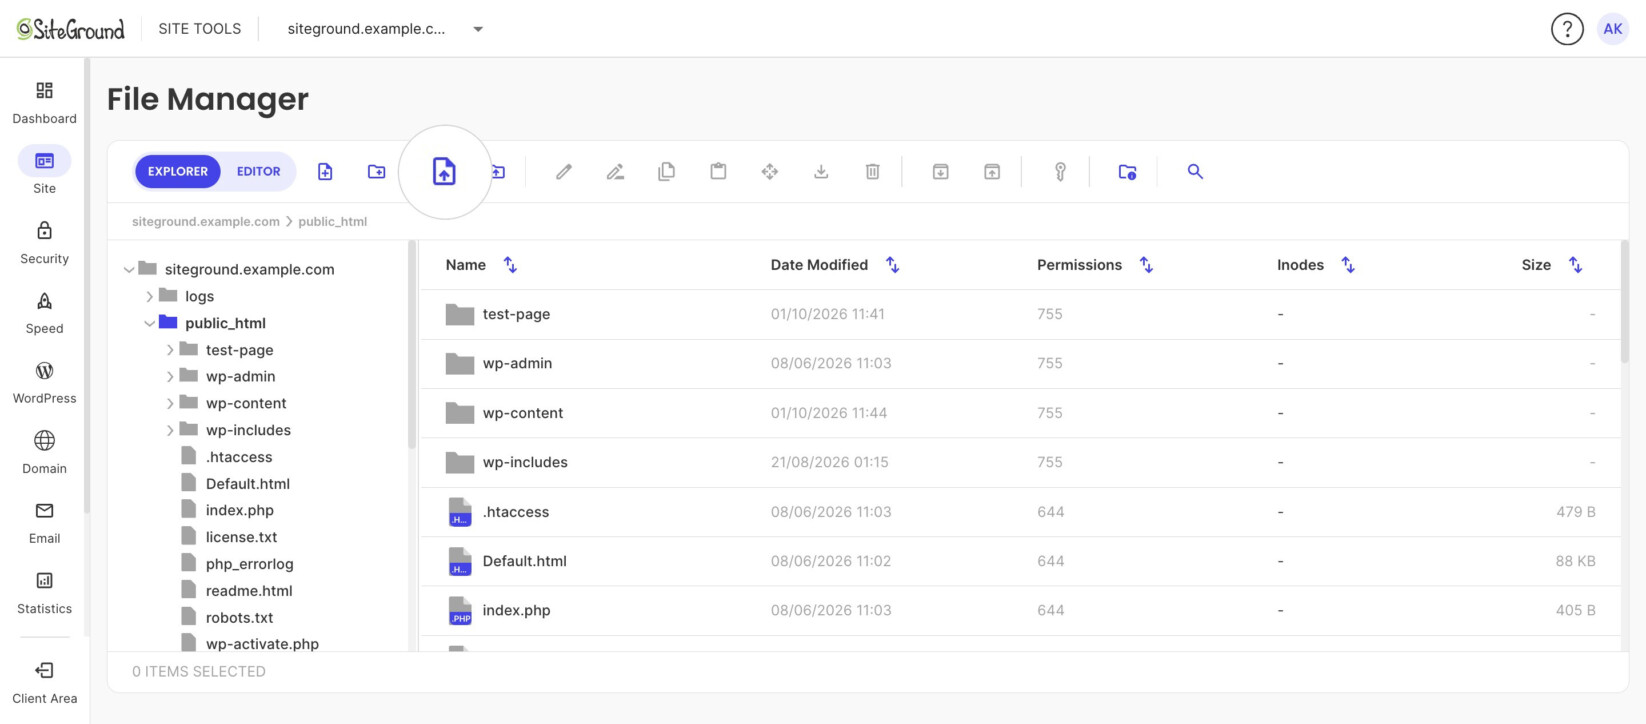
If you haven’t recently migrated the website, the index file may have been deleted by mistake. You can restore the index file from the backup service of your hosting. SiteGround clients can use the Backups tool in Site Tools to restore specific files.
Inspect the .htaccess file of the Website
Look for “deny from” rules in your website’s .htaccess file and remove any you didn’t intend. A common cause of the “Restricted Access” error is Apache rules placed in the .htaccess file. Using those rules, you can define which IP addresses can access your site, which files should be accessible, etc.
The rules can be added manually by the website owner or a collaborator, but there are also many plugins for WordPress that can automatically add such rules.
You should open the .htaccess file to examine the code via FTP or File Manager. On SiteGround hosting, you can use the File Manager in Site Tools:
- In your Client Area, go to Websites and click Site Tools next to your website.
- Go to Site > File Manager.
- Open your website’s root folder, which is your website name/public_html.
- Select the .htaccess file and click Edit to open it in the editor.
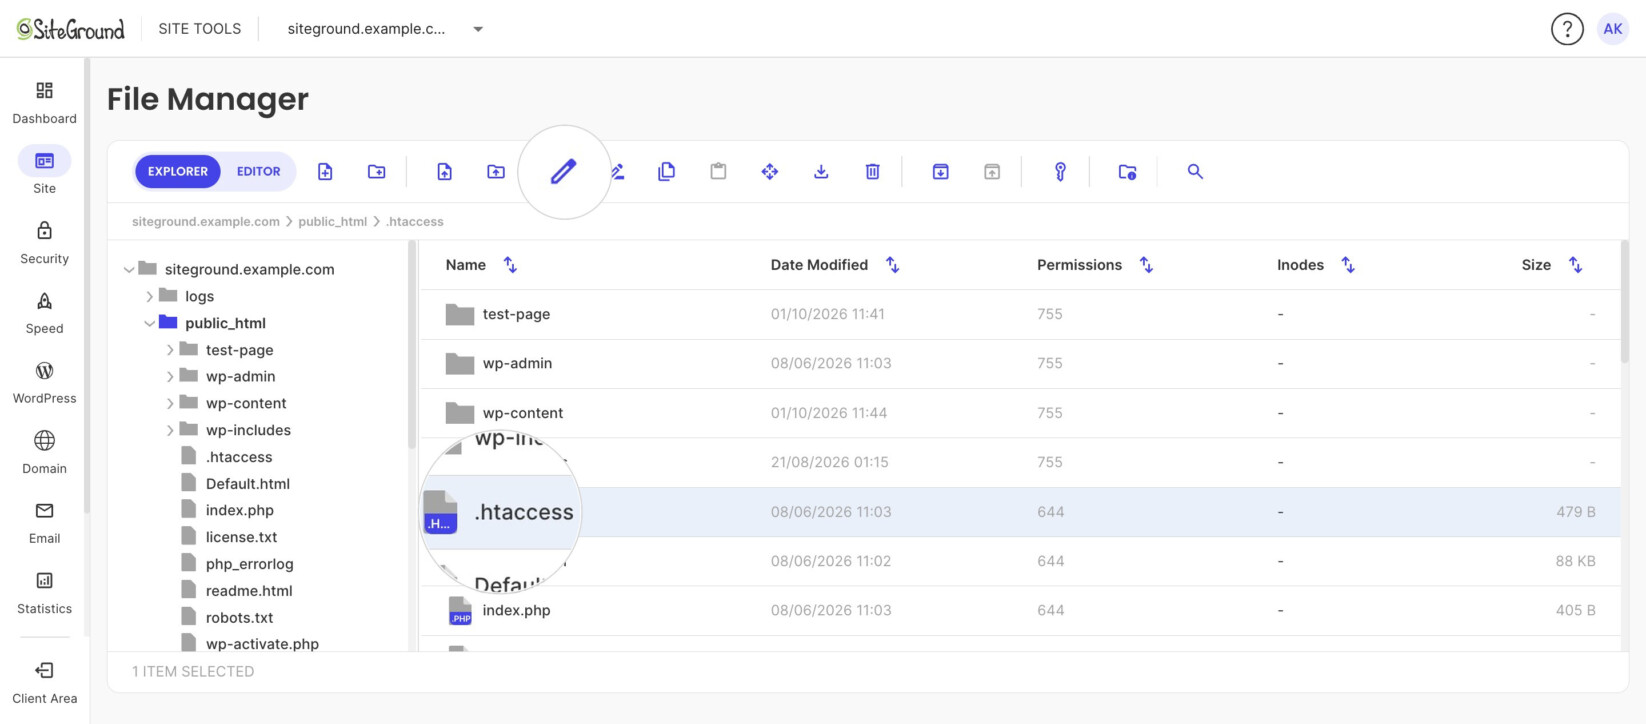
Look for any “deny from” rules as they limit access to the website. In our case, there is a “deny from” order that limits access for any visitor.
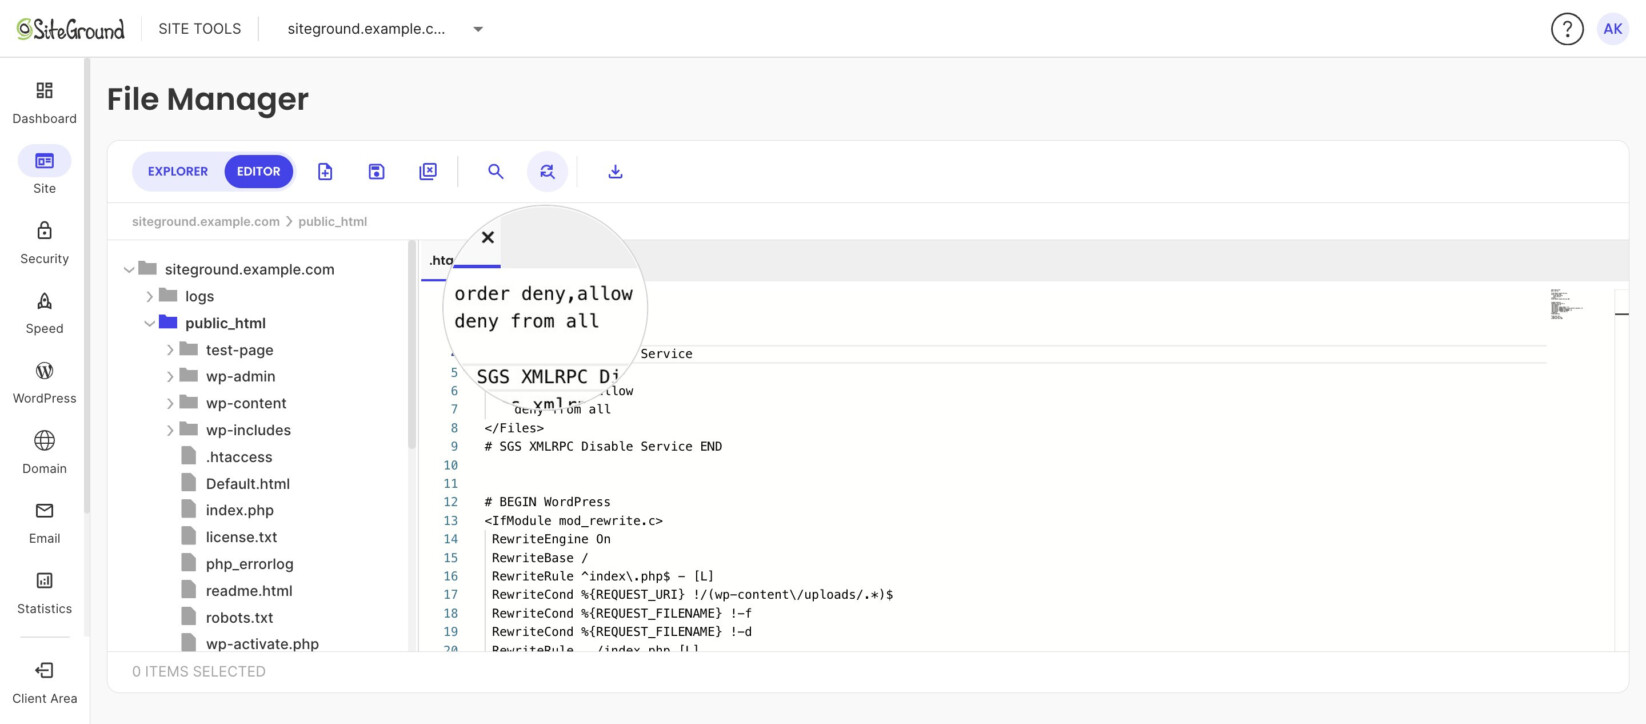
Your website may have a similar code restricting access to it. Find similar directives in your .htaccess file, delete them, and Save the changes.
Note: Rules inside a <Files> block apply only to that file. For example, SiteGround adds a block that denies access to xmlrpc.php (marked # SGS XMLRPC Disable Service) to protect your site. Leave such blocks in place unless the file they name is the one returning the error.
If you have trouble finding the code and the issue started recently, you may consider restoring the .htaccess file from a backup made before the problem existed. Find detailed steps in this tutorial about restoring files from a backup.
Examine the security panel on your hosting server
Check whether your hosting panel blocks your IP address or country. Apart from the .htaccess file, another method for blocking access is your hosting server. Such restrictions are not set directly in a file on your website but rather on the reverse proxy server of your hosting.
Typically, those settings are managed in a dedicated security section of the hosting panel. SiteGround users are able to control the access from Site Tools > Security > Blocked Traffic.
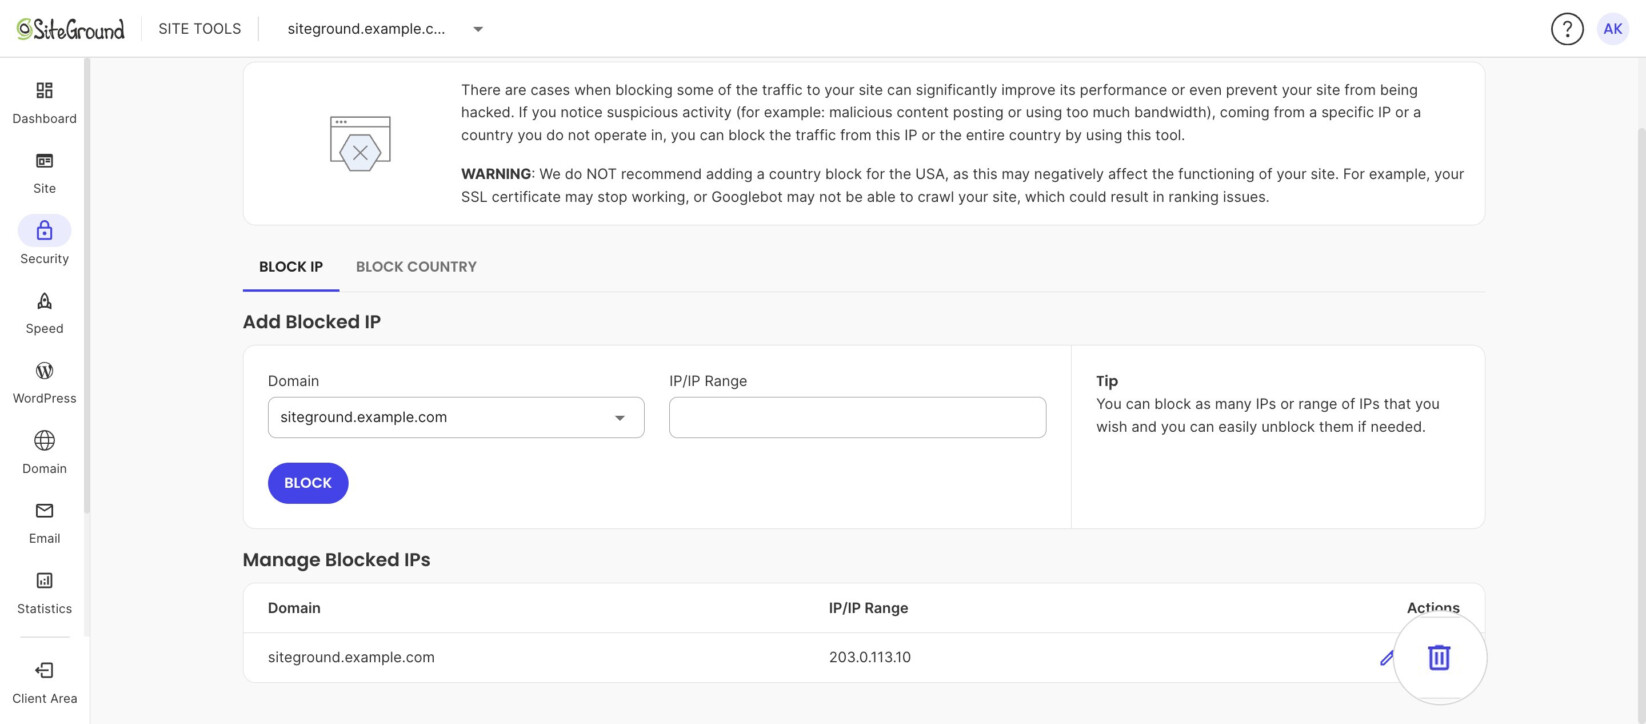
In this section, you can limit individual IPs or a range of IPs, or block traffic from entire countries. To remove a restriction you didn’t intend:
- In Site Tools, go to Security > Blocked Traffic.
- On the Block IP tab, find the IP or IP range in the Manage Blocked IPs list.
- Delete it from the Actions column.
- If you block countries, check the Block Country tab as well.
Disable the plugins in your WordPress website
Deactivate all plugins, then reactivate them one by one to find the one causing the error. WordPress websites frequently suffer from the “HTTP 403” error due to a faulty plugin. It may be an incorrect setting in a security plugin or a conflict between several plugins.
A standard troubleshooting method is to disable the plugins. Given that the 403 error is not preventing access to the dashboard, follow these steps:
- In your WordPress dashboard, go to Plugins > Installed Plugins.
- Select the checkbox next to Plugin at the top of the list to select all plugins.
- From the Bulk actions drop-down, select Deactivate.
- Click Apply.
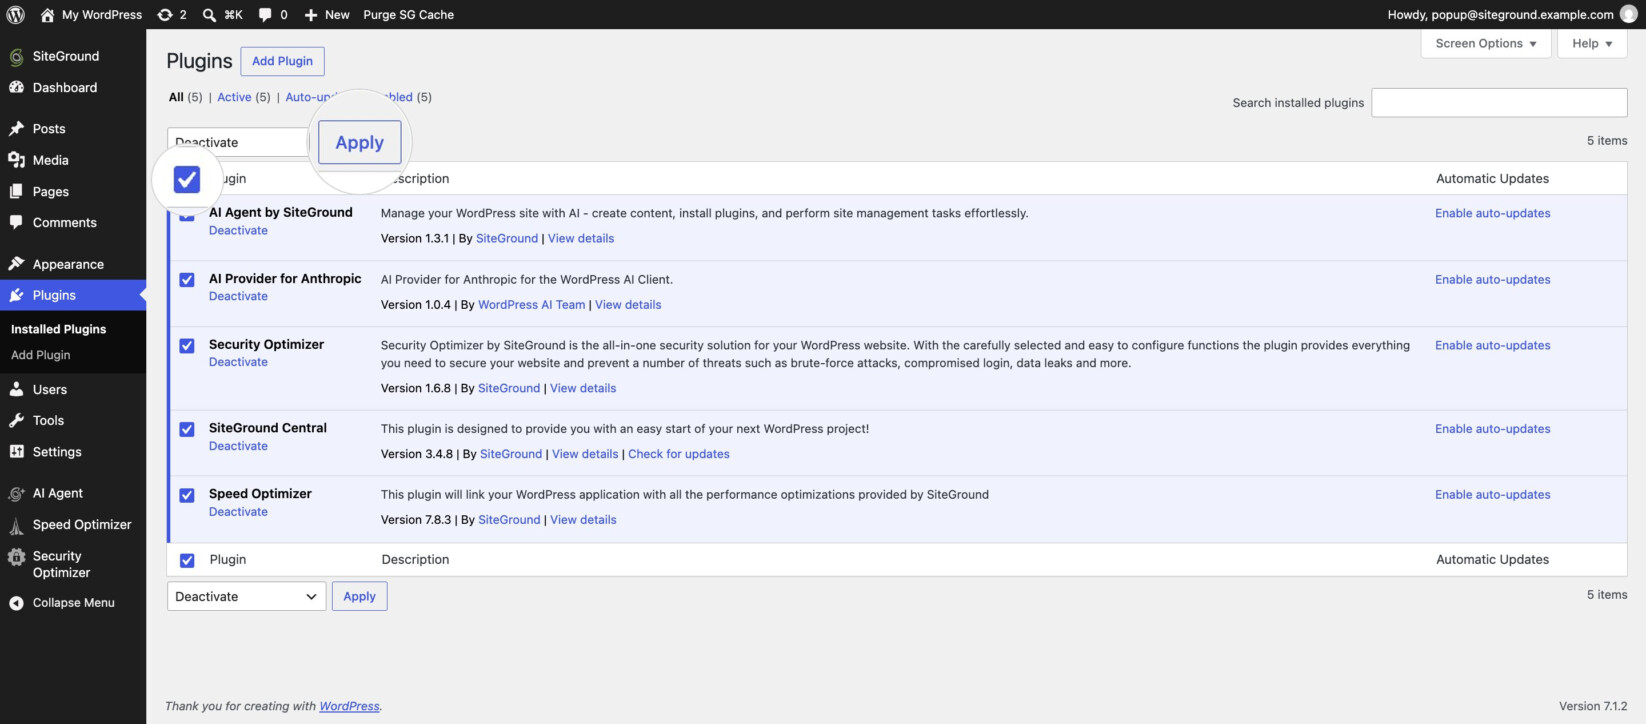
After the plugins are disabled, try loading the page again. If the error is no longer present, it means that one of the plugins caused it. Activate them one by one to find out which plugin causes the problem. Then, you can replace the plugin with an alternative one or contact its developers.
Occasionally, the error may lock you out of the dashboard. Thus, you need to use an alternative method to disable the plugins. You can find the detailed steps in the following tutorials:
- How to disable the plugins for a WordPress site in Site Tools?
- How to disable the plugins for a WordPress site from the database?
What causes the “403 Forbidden” Error?
The reason why you see the “403 Forbidden” error could have different origins. It could stem from a local problem from the visitor’s side or a specific setting or issue of the website.
From a visitor’s perspective, the possible causes include:
- You loaded the webpage at a brief moment when the website experienced the error
- Expired cached files and cookies from the browser
- You are visiting an incorrect webpage URL
On the other hand, the restriction for visitors may be intentional. Some website owners choose to make the website available only for specific networks, countries, or users. Therefore, the 403 error’s meaning could be:
- Your IP may be part of a blocked range of IPs
- The website is available only to specific users
When all visitors observe the “403 Forbidden”, it usually means the problem stems from the website. The access may be restricted unintentionally due to a misconfiguration. The standard issues are:
- A conflict between folders and website pages with identical names
- The website domain is not pointed to the correct server
- Wrong permissions for the website’s files and folders
- Missing index file
- Restrictive rules in the website’s .htaccess file
- Restricted IPs from the website’s reverse proxy
- Misconfigured WordPress plugins
How to Fix 403 Forbidden Error in WordPress – Video Tutorial
Summary
The “403 Forbidden” error indicates that your browser is restricted from visiting a website. Understanding the problems causing the error is crucial for fixing them on time – before the website suffers from traffic loss.
Another error caused by restrictions is the “401 Unauthorized” error. For detailed information, read this tutorial about the 401 error and how to fix it.
Read the following guides for restricting access to your website correctly.
Become an expert in tackling all types of HTTP errors! Download our Guide on How to Fix the Most Common HTTP errors!
Frequently Asked Questions
What is the difference between a 403 and a 401 error?
A “401 Unauthorized” error means the request lacks valid login credentials, so signing in with the correct ones can fix it. A “403 Forbidden” error means the server refuses access to the page even though it understood the request, and logging in usually doesn’t help. For details, read about the 401 error and how to fix it.
What is the difference between a 403 and a 404 error?
A “404 Not Found” error means the server can’t find the page you requested. A “403 Forbidden” error means the page or folder may exist, but the server won’t let you access it.
Is the 403 error caused by my device or by the website?
Open the page from another device or network. If the error appears only for you, try the visitor fixes: reload the page, clear your browser cache and cookies, and check the URL. If every visitor sees the error, the cause is in the website’s configuration, and only the website owner can fix it.
Can a 403 error affect my website’s search rankings?
Yes, if it lasts. Search engine crawlers that receive a 403 error can’t access the page, so they can’t index it, and the page may drop out of search results over time. If you block traffic by IP or country, make sure you don’t block search engine crawlers. For example, blocking the USA can prevent Googlebot from crawling your site.