Email Authentication Tutorial
Setting up SPF, DKIM, and DMARC tells receiving mail servers your emails are legitimate. Set up all three; each one closes off a different way spammers can impersonate your domain.
Go to Site Tools > Email > Authentication to turn these on. Once enabled, you’ll get fewer failed-delivery notifications caused by spammers forging your domain, and receiving servers will be able to tell your real emails from forged ones.
What you’ll need
- Your domain’s DNS pointed to your SiteGround account
- Access to Site Tools > Email > Authentication / Access to DNS Zone Editor (for DMARC)
- If you use Email Marketing: a domain selected in the tool, and a mailbox for DMARC reports
Quick overview
| Protocol | What it checks | Where it lives | What a failure means |
| SPF | Is this server allowed to send for this domain? | A DNS TXT record | Message may be flagged or rejected as spoofed |
| DKIM | Was this message altered in transit? | A DNS TXT record (public key) + a signature in the message header | Signature doesn’t match — message integrity can’t be confirmed |
| DMARC | Did SPF and/or DKIM pass, and what should happen if not? | A DNS TXT record (policy) | Message is quarantined, rejected, or delivered per your policy — and you get a report |
Step 1: Set up SPF
SPF is enabled by default for your domain, so there’s nothing to activate. Go to Site Tools > Email > Authentication > SPF to see and manage it.
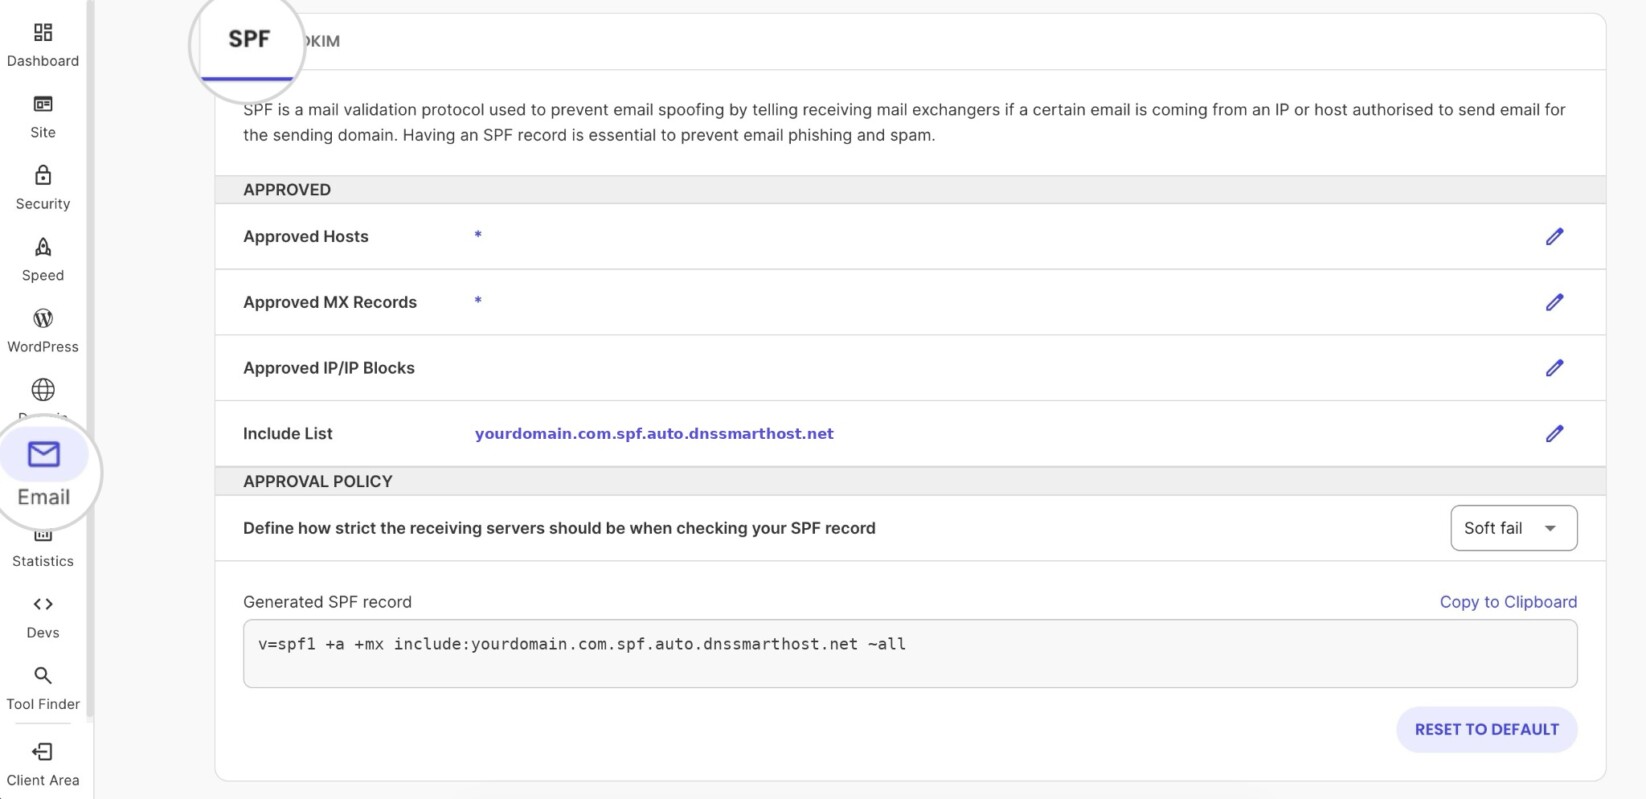
The page shows two sections.
Approved covers who’s allowed to send: Approved Hosts and Approved MX Records are marked required by default, Approved IP/IP Blocks lets you allow specific IPs, and the Include List already contains an auto-generated value unique to your domain.
Approval Policy sets how strict receiving servers should be — Soft fail is the default and safest starting point.
At the bottom, Generated SPF record shows the exact record this builds, with a Copy to Clipboard link. Use Reset to Default to undo any custom changes.
What to do if SPF fails
Check whether you have more than one SPF record for your domain — you can only have one. If you’re already sending through another tool, merge include:_spf.emsnd.net into that existing record rather than creating a second one.

How to verify SPF is working
Use an SPF lookup tool such as MXToolbox to confirm your record is valid and includes the correct senders.
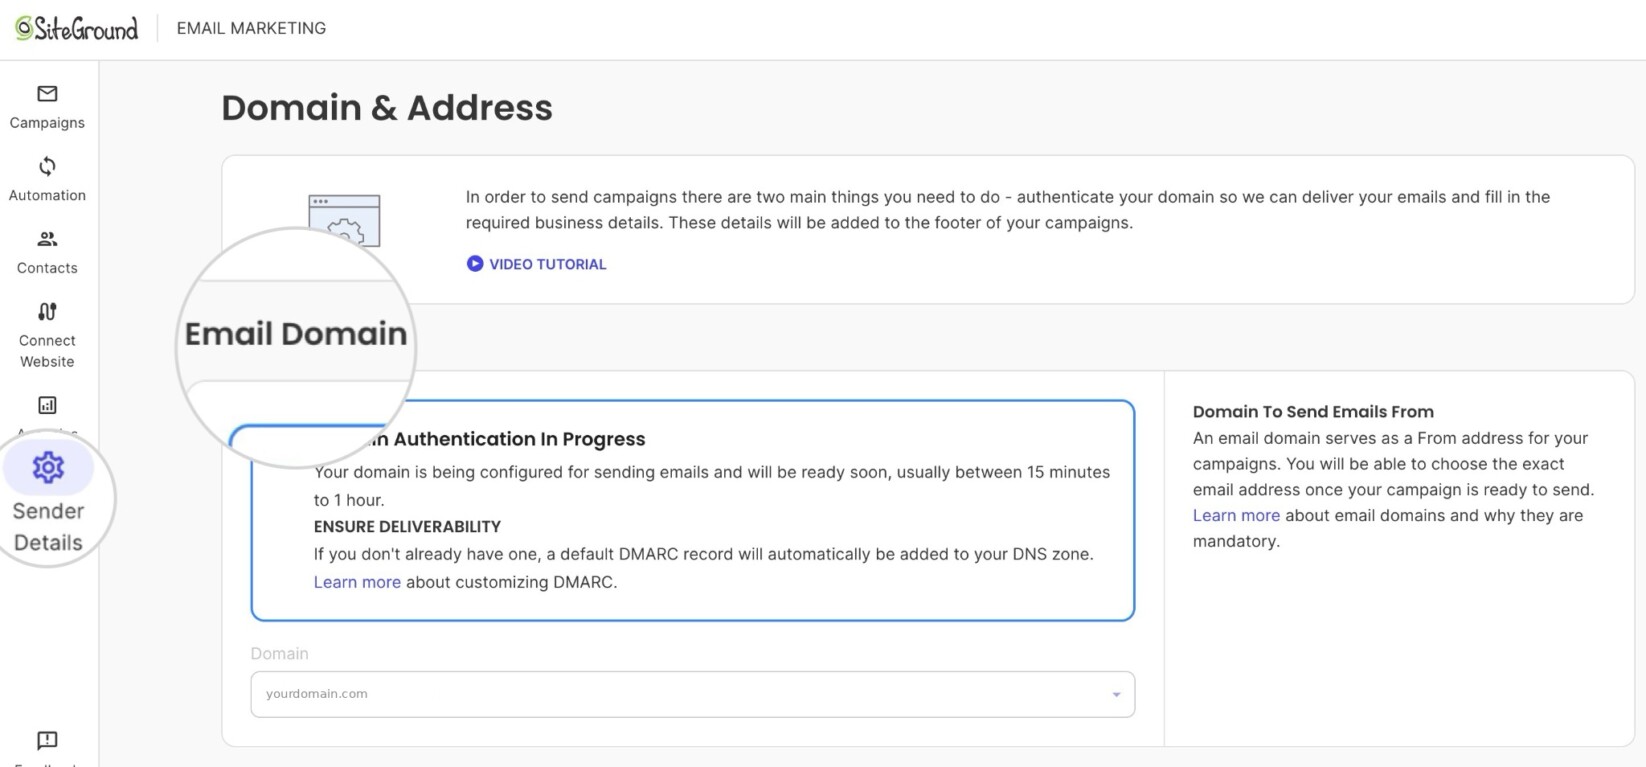
If you use SiteGround Email Marketing, you can also check the Sender Details section in the tool. It shows your domain’s authentication status — “Domain authentication required,” “in progress,” or “Your sender domain is authenticated successfully!” once SPF, DKIM, and DMARC all pass.
Step 2: Set up DKIM
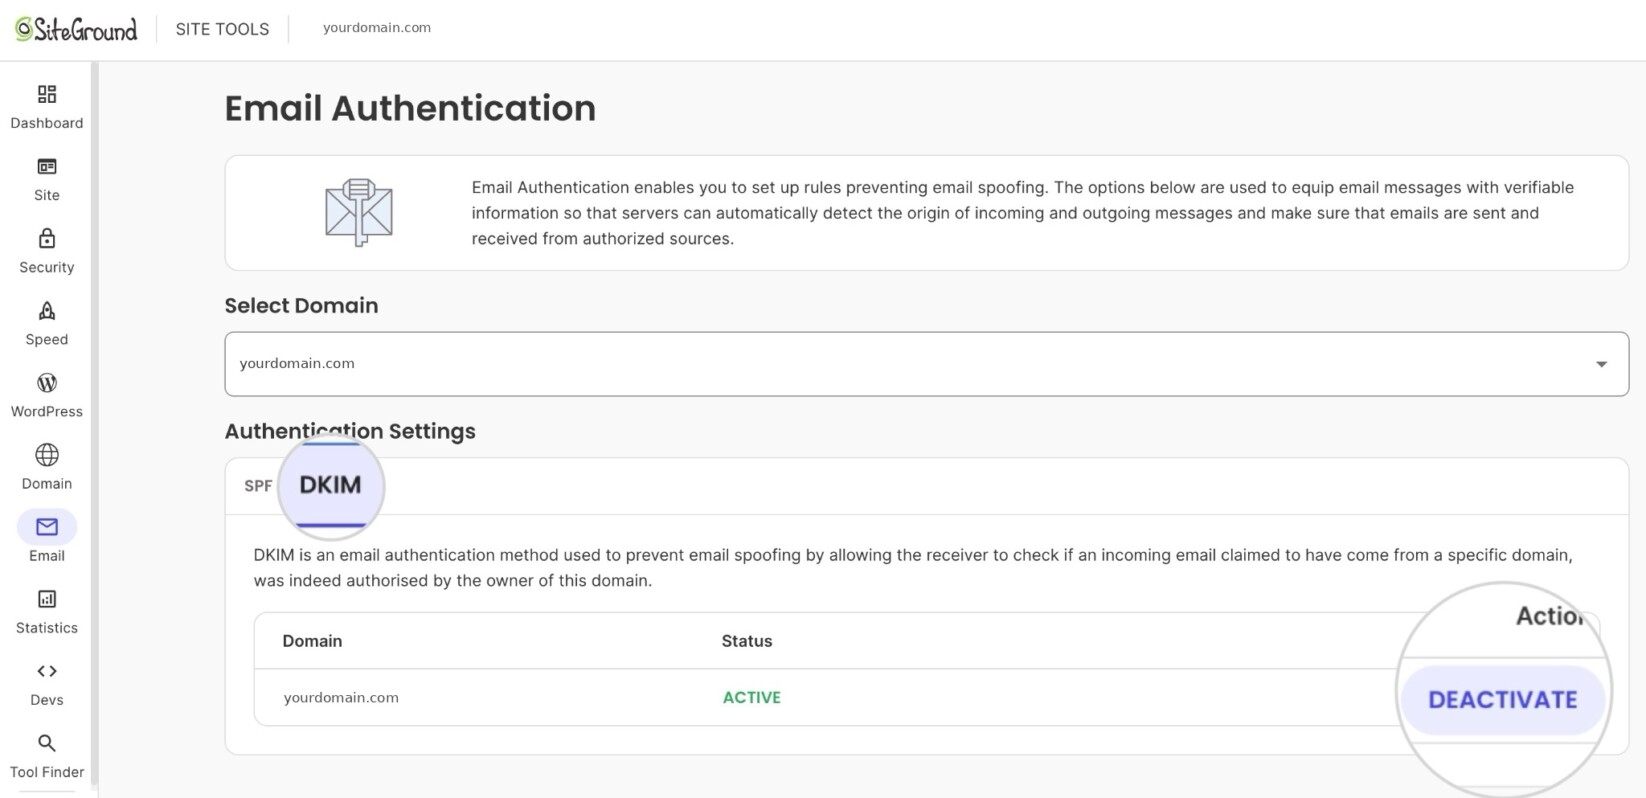
Go to Site Tools > Email > Authentication > DKIM. The Status column shows ACTIVE or INACTIVE for each domain. If it’s INACTIVE, click Activate — the record is added to your DNS zone automatically, no further steps needed.
What to do if DKIM doesn’t activate
Check that your domain’s nameservers are pointed to SiteGround. Go to Client Area > Services > Domains > Settings for that domain. If your domain’s DNS zone isn’t pointed to SiteGround, you’ll see it labeled “External Domain” in your account, with a message that it’s “not hosted by us.”
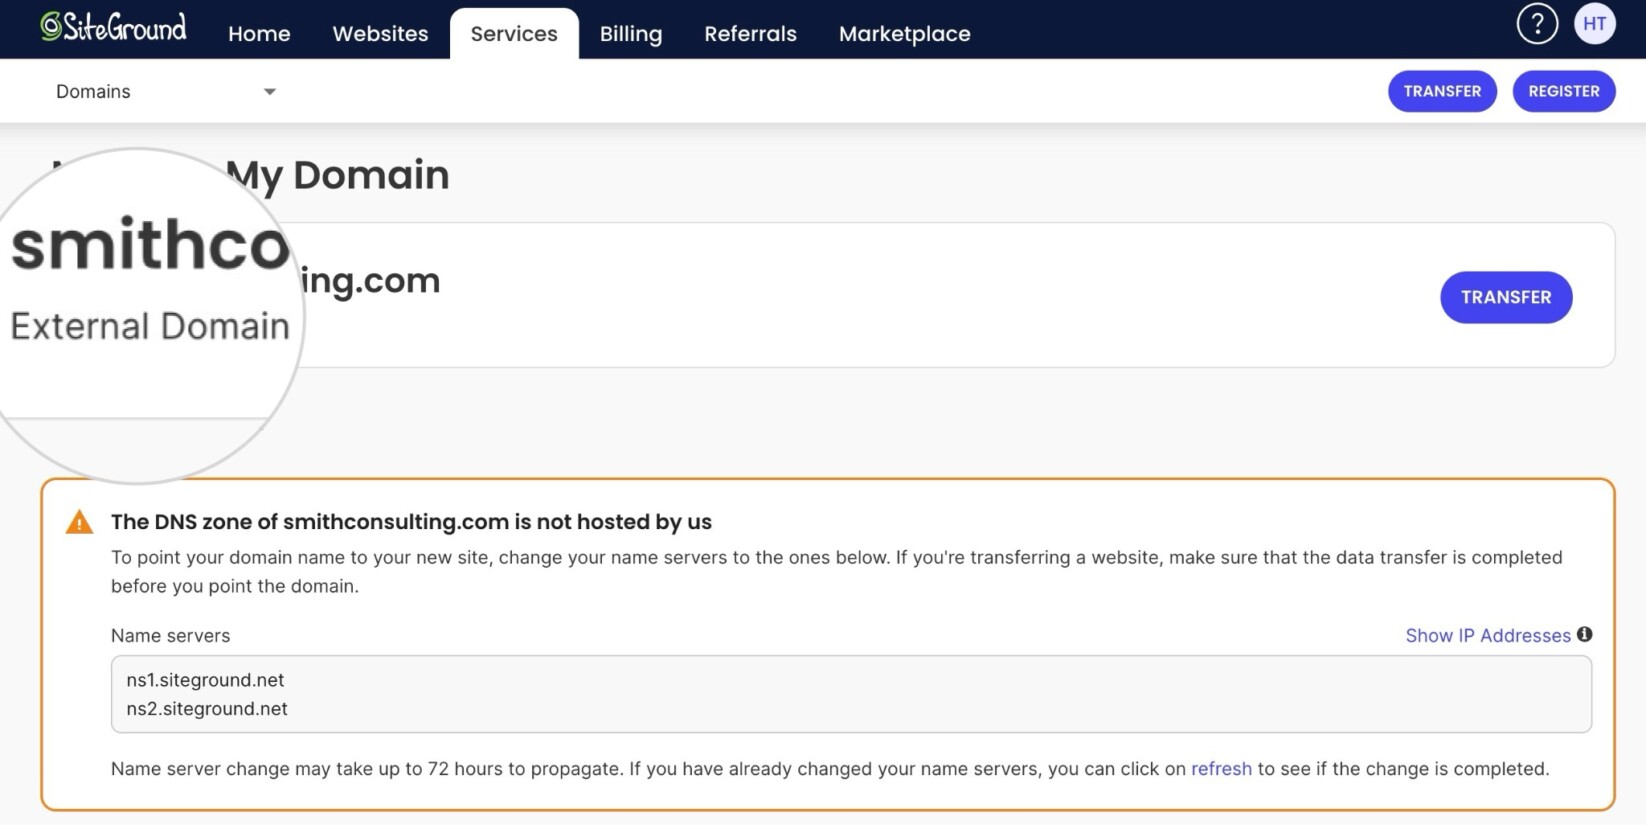
If your DNS zone is managed elsewhere, Site Tools can’t add the record automatically. You’ll need to copy the DKIM record shown in Site Tools and add it manually through your other DNS provider.
Using SiteGround Email Marketing with external nameservers? The record above doesn’t apply to you — Email Marketing gives you a separate CNAME record instead, usually named mailmarketing._domainkey (or mailmarketing._domainkey.yourdomain.com, depending on whether your DNS zone appends the domain automatically). Add it as a new record without removing anything already there. In rare cases, Email Marketing may provide a TXT record instead — if so, add that record type exactly as shown.
How to verify DKIM is working
If your DNS is at SiteGround, Check the Status column in Site Tools > Email Authentication > DKIM shows ACTIVE. To confirm signatures are actually valid, send a test email to yourself and inspect the message headers for a DKIM signature, or use an online DKIM checker.
Step 3: Set up DMARC
Go to Site Tools > Domain > DNS Zone Editor and look for the TXT record that starts with v=DMARC1. Click the pencil icon next to it to edit it.
If one already exists, click the pencil icon next to it to edit it — add your own reporting address to the rua value, since that’s not something that comes pre-filled.
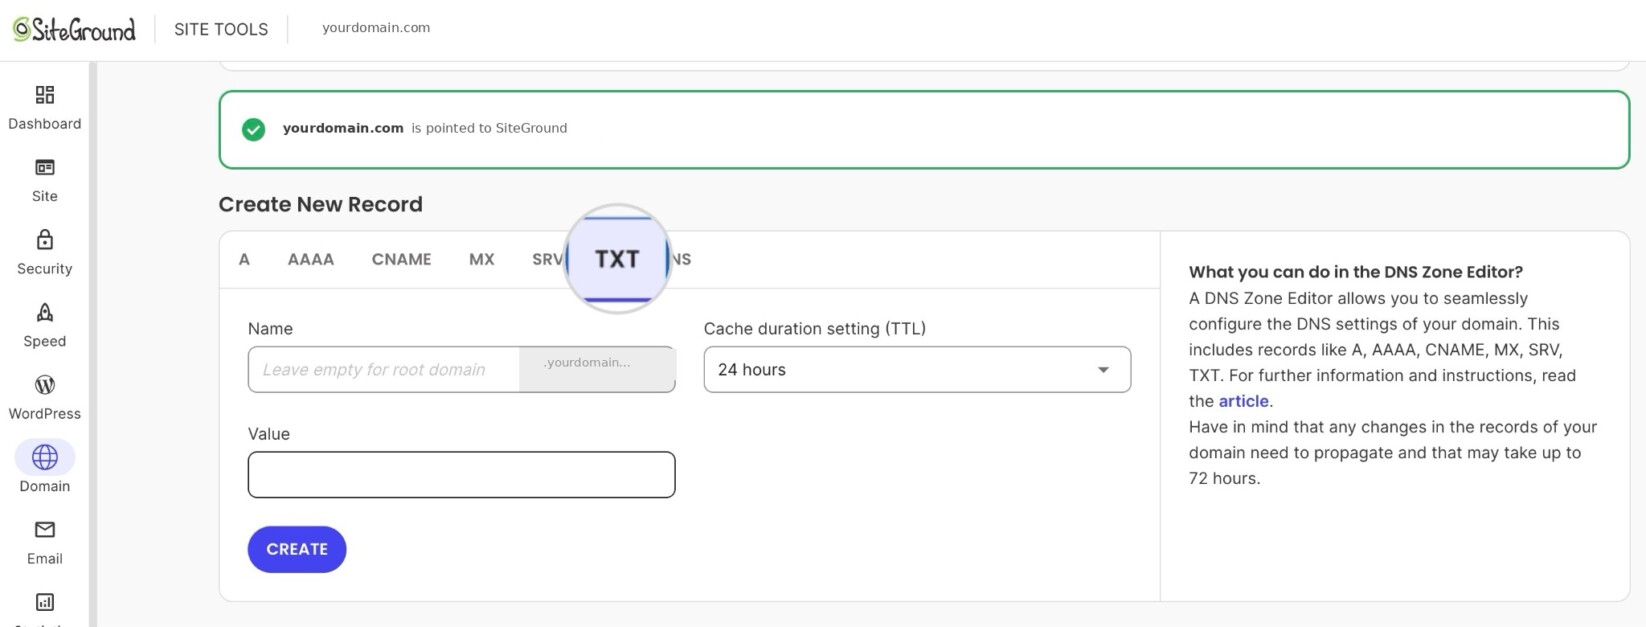
If no v=DMARC1 record exists (uncommon, but possible if it was removed or the domain predates this default), create a new TXT record instead:
- Name: _dmarc.yourdomain.com (or just _dmarc, depending on whether your DNS zone appends the domain automatically)
- Type: TXT
- TTL: use default
- Value: v=DMARC1; p=none; rua=mailto:dmarc-reports@yourdomain.com
What to do if DMARC reports show failures
Don’t move straight to p=quarantine or p=reject. Review a few weeks of reports first, confirm nothing legitimate is getting caught, then tighten the policy once you’re confident.
If your DNS zone is managed elsewhere
DNS Zone Editor only manages records for domains pointed to SiteGround’s nameservers, so you won’t find an existing DMARC record there to check or edit. Add the record directly through your external DNS provider instead. Use the same Name, Type, and Value shown above (or the exact value Email Marketing gave you, if you’re setting this up for that tool).
Checking your setup after a few days
DMARC reports are the best way to confirm all three protocols are working together, not just individually. Allow up to 72 hours for your DMARC record to propagate, then check it with an online DMARC checker tool. Once reports start arriving at your designated address, review them for a few weeks — they’ll show whether your legitimate mail (and any other services sending on your behalf) is passing SPF and DKIM cleanly.
Common mistakes and how to avoid them
Setup rarely fails all at once; it’s usually one small thing. Here’s what to check first.
Forgetting to update SPF when you add a new sending tool
Every service that sends mail on your behalf needs to be included in your SPF record. Adding a new tool without updating SPF means its emails may fail authentication.
Mismatched “from” domains between DKIM and your visible sender address
If the domain in your visible “from” address doesn’t match the domain your DKIM signature is tied to, DMARC can still fail even though DKIM itself passed.
Assuming SPF alone is enough
SPF checks the sending server; it doesn’t verify message integrity or give you a policy for handling failures. DKIM and DMARC cover what SPF doesn’t.
Next steps
If you’re sending campaigns through SiteGround’s Email Marketing tool, having SPF, DKIM, and DMARC set up correctly is one of the biggest factors in whether those campaigns actually reach the inbox.
Tips from the SiteGround team
- If you manage multiple domains, authenticate them one at a time rather than all at once. It’s easier to trace a DMARC failure back to its cause when you’re only watching one domain’s reports.
- Keep a record of every service that sends mail on your behalf (your website’s contact form, any third-party tool, Email Marketing). It’s the fastest way to catch an SPF failure before it happens.
- DMARC reports are XML and not easy to read by eye — a free report parser can save time if you’re reviewing them regularly.
FAQs about email authentication
Do I need SPF, DKIM, and DMARC all three?
Yes. Each one checks something different — leaving one out means that check never happens.
What happens if I only set up SPF?
DKIM and DMARC still won’t run, so forged emails using a spoofed “from” address can still get through.
How long does it take for DNS records to propagate?
Usually a few hours, but allow up to 72 hours before troubleshooting.
Why did my email authentication fail?
Most often a typo in the DNS record, more than one SPF record, or DNS not yet propagated.
Can I set up DMARC without SPF and DKIM?
Technically yes, but it won’t do much — DMARC relies on SPF and/or DKIM passing to have anything to check.